System Requirements
This is the recommended hardware configuration required to set up an Avail node.
| Hardware | Requirement |
|---|---|
| CPU | 8 Cores |
| RAM | 16 GB |
| Disk | 500 GB |
| Bandwidth | 10 MBit/s |
Official documentation on how to run a node on Avail can be found at https://docs.availproject.org
Setup node/validator name
Replace YOUR_MONIKER_GOES_HERE with your node/validator name
MONIKER="YOUR_MONIKER_GOES_HERE"
Install dependencies
Update system and install build tools
sudo apt -q update
sudo apt -qy install curl git jq lz4
sudo apt -qy upgrade
Download binaries
# Download binary
curl -L https://github.com/availproject/avail/releases/download/v2.3.4.1/x86_64-ubuntu-$(lsb_release -sr | tr -d .)-avail-node.tar.gz | tar -xz -C /usr/local/bin

# Display version
avail-node --version
# avail-node 2.2.0-a6600ea38c9
Create Systemd service unit
sudo tee /etc/systemd/system/avail.service > /dev/null << EOF
[Unit]
Description=Avail node
After=network-online.target

[Service]
User=$USER
ExecStart=$(which avail-node) \
  --base-path $HOME/.avail/data/ \
  --chain mainnet \
  --name "$MONIKER" \
  --rpc-external \
  --rpc-cors all \
  --rpc-methods safe
Restart=on-failure
RestartSec=10
LimitNOFILE=65535

[Install]
WantedBy=multi-user.target
EOF

sudo systemctl daemon-reload
sudo systemctl enable avail.service
Download latest snapshot
# Create data folder
mkdir -p $HOME/.avail/data/chains/avail_da_mainnet/paritydb

# Download latest snapshot
curl -L https://snapshots.kjnodes.com/avail/snapshot_latest.tar.lz4 | tar -Ilz4 -xf - -C $HOME/.avail/data/chains/avail_da_mainnet
Start service
sudo systemctl start avail.service
Check the logs and telemetry
journalctl -u avail.service -f --no-hostname -o cat
Your journal output should look something like this:
Started avail.service - Avail node.
2024-10-25 10:48:10 Avail Node
2024-10-25 10:48:10 ✌️  version 2.2.0-a6600ea38c9
2024-10-25 10:48:10 ❤️  by Avail Project <info@availproject.org>, 2017-2024
2024-10-25 10:48:10 📋 Chain specification: Avail DA Mainnet
2024-10-25 10:48:10 🏷  Node name: avail-demo-node
2024-10-25 10:48:10 👤 Role: AUTHORITY
2024-10-25 10:48:10 💾 Database: ParityDb at /root/.avail/data/chains/avail_da_mainnet/paritydb/full
2024-10-25 10:48:14 🏷  Local node identity is: 12D3KooWNWvJdSTLoewGWmo3SjMrqjmaQwK21wnq5KsstSEWXpqe
2024-10-25 10:48:14 Prometheus metrics extended with avail metrics
2024-10-25 10:48:14 💻 Operating system: linux
2024-10-25 10:48:14 💻 CPU architecture: x86_64
2024-10-25 10:48:14 💻 Target environment: gnu
2024-10-25 10:48:14 💻 CPU: Intel Xeon Processor (Skylake, IBRS, no TSX)
2024-10-25 10:48:14 💻 CPU cores: 8
2024-10-25 10:48:14 💻 Memory: 15613MB
2024-10-25 10:48:14 💻 Kernel: 6.8.0-45-generic
2024-10-25 10:48:14 💻 Linux distribution: Ubuntu 24.04.1 LTS
2024-10-25 10:48:14 💻 Virtual machine: yes
2024-10-25 10:48:14 📦 Highest known block at #488180
2024-10-25 10:48:14 〽️ Prometheus exporter started at 127.0.0.1:9615
2024-10-25 10:48:14 Running JSON-RPC server: addr=127.0.0.1:9944, allowed origins=["http://localhost:*", "http://127.0.0.1:*", "https://localhost:*", "https://127.0.0.1:*", "https://polkadot.js.org"]
2024-10-25 10:48:14 🏁 CPU score: 818.82 MiBs
2024-10-25 10:48:14 🏁 Memory score: 4.37 GiBs
2024-10-25 10:48:14 🏁 Disk score (seq. writes): 751.77 MiBs
2024-10-25 10:48:14 🏁 Disk score (rand. writes): 297.99 MiBs
2024-10-25 10:48:14 👶 Starting BABE Authorship worker
2024-10-25 10:48:15 🔍 Discovered new external address for our node: /ip4/188.245.149.172/tcp/30333/p2p/12D3KooWNWvJdSTLoewGWmo3SjMrqjmaQwK21wnq5KsstSEWXpqe
2024-10-25 10:48:16 🔍 Discovered new external address for our node: /ip6/2a01:4f8:1c1b:cf0a::1/tcp/30333/p2p/12D3KooWNWvJdSTLoewGWmo3SjMrqjmaQwK21wnq5KsstSEWXpqe
2024-10-25 10:48:17 🔍 Discovered new external address for our node: /ip4/128.0.0.1/tcp/30333/p2p/12D3KooWNWvJdSTLoewGWmo3SjMrqjmaQwK21wnq5KsstSEWXpqe
2024-10-25 10:48:19 💤 Idle (10 peers), best: #488468 (0x4632…06f8), finalized #488466 (0xd2b6…4e69), ⬇ 435.0kiB/s ⬆ 55.7kiB/s
2024-10-25 10:48:20 ✨ Imported #488469 (0x0c78…87b7)
Once we see 💤 Idle, we are done syncing, and our node has now fully caught up.
Your node will appear on the Avail Telemetry site. Be sure to select the appropriate network tab at the top to view your node’s status.

Check your node health
Check node sync status and connected peers by following command below:
curl -s -H "Content-Type: application/json" -d '{"id":1, "jsonrpc":"2.0", "method": "system_health", "params":[]}' http://localhost:9944 | jq .result
Example output:
{
  "peers": 37,
  "isSyncing": false,
  "shouldHavePeers": true
}
If isSyncing is false, it means your node is fully caught up with the latest block
Validator setup
To set up a validator, follow the steps below. We highly recommend reading the official validator documentation before proceeding.
Enabling Validator mode
To run node in validator mode, add the --validator flag to the execution command in systemd service. Without this mode, the node won’t produce new blocks.
Use nano or vim to edit systemd service file
nano /etc/systemd/system/avail.service
To apply changes you have to realod the systemd configuration
sudo systemctl daemon-reload
Create Stash and Controller accounts
Before you can become an active validator, you need to bond your funds to your node. This involves creating two separate Avail accounts: stash account for holding your funds and controller account for managing staking actions.
To create STASH and CONTROLLER accounts repeat the following steps below:
- Navigate to Avail Explorer and press
Add accountbutton - Save
mnemonicand create account.
Make sure you have backed up the mnemonic phrases generated earlier to recover your accounts in the future.
Top up the accounts
Top up both accounts with tokens. You can buy and transfer AVAIL tokens from popular Crypto Exchanges like Bybit.
-
For
Stash Accountyou generally need to bond at least50,000AVAIL to register your validator. -
The
Controller Accountusually does not require a specific minimum amount, but it should have enough tokens to pay transaction fees. Having at least1AVAIL in the controller account is generally a good practice.
Setting your On-Chain Identity
Once your account has been funded from the faucet, you should be able to set your on-chain identity.
- On the
Accountspage of the Avail Explorer, navigate to your funded account and click on the 3-dotted line. - Select
Set on-chain identity - Fill in the appropriate fields you want to set your identity on-chain.
- Authorize the transaction with your account password, do not change the app-id. And click on
Sign and Submit.
Bond your funds
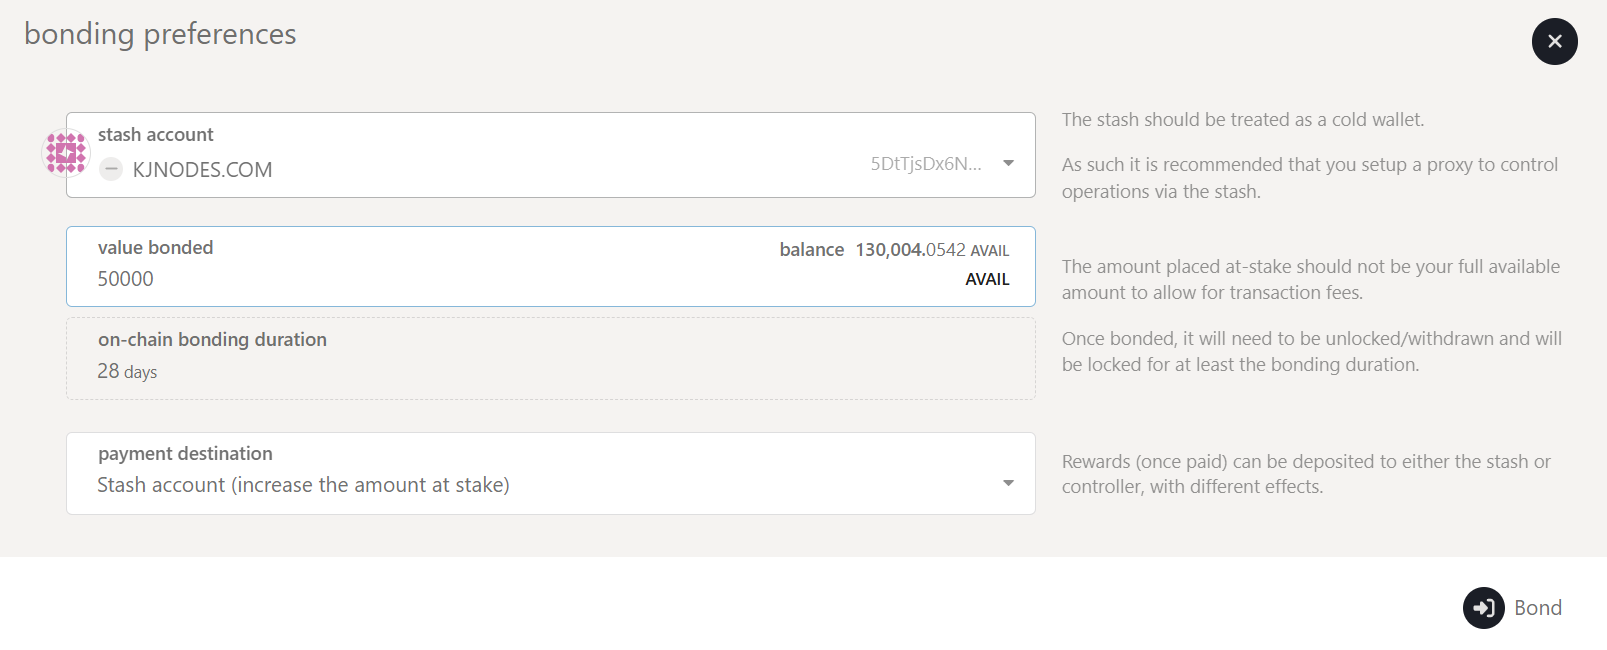
Don’t bond all your AVAIL tokens as you’ll need some for transaction fees. You can always bond more tokens later. Note: Withdrawing any bonded amount is subject to the duration of the unbonding period.
- Navigate to the
Stakingtab in the Explorer. - Click on
Stashto initiate the bonding process.

- Fill in the bonding preferences. Then click
BondandSign and Submit.
To join wating list you will have to stake at least 50,000 AVAIL.
Generate Session Keys
Our node is operating in validator mode, however the network expects validator to be online. To enable block production, besides using the --validator flag, the node needs session keys for signing various parts of block production. Without these keys, the network can’t identify the block producer,
To generate session keys follow the command below:
curl -s -H "Content-Type: application/json" -d '{"id":1, "jsonrpc":"2.0", "method": "author_rotateKeys", "params":[]}' http://localhost:9944
Example output:
{
  "jsonrpc":"2.0",
  "result":"0x64ce7ca011d983115c7e8e94a8cb3843b78c3d3a5b8f3f1c32bb75afac499f6aecae63af27f524a3caffa869295519abcddaa372982ad644d4000daa7dc2c1d4f0553848661e55d645aa00758994c4fcec63a98700aa6c88c859d64d47363150e03b88a067e60cc0ba7333a88db5bf44ca6fa5e3327c64c5ec02244b168fe803",
  "id":1
}
The command generated the session keys for us and store them inside .avail/data/chains/avail_da_mainnet/keystore folder.
This key is unique to your own node, so it’s important to make sure that it is stored safely and never shared with anyone.
Submit Session Keys
You must inform the network of your Session Keys by signing and submitting the setKeys extrinsic. This action associates your validator with your Controller account.
- Navigate back to the
Stakingtab. - Click on
Set Session Keyand enter the hex-encoded result. - Click
Set Session Keyand enter your password when prompted.

After submitting the extrinsic, you’ll observe that Set Session Key changes to Validate. Make sure your node is fully synchronized before proceeding further.
Register as a Validator
- Click
Validateon theStakingtab. - Set your validator commission percentage.
- Enter your password and click
Validate.
Start Validation
Your validator is now prepared to begin the validation process. If you wish to discontinue, you can click the stop icon.
Please note that the Avail interface doesn’t automatically verify if your node is synchronized. You will need to confirm this manually. If your node has sufficient stake, the Avail blockchain will likely select it in the next epoch or two.
Verify Validator Status
To verify that your node is ready for possible selection at the end of the next era, follow these steps:
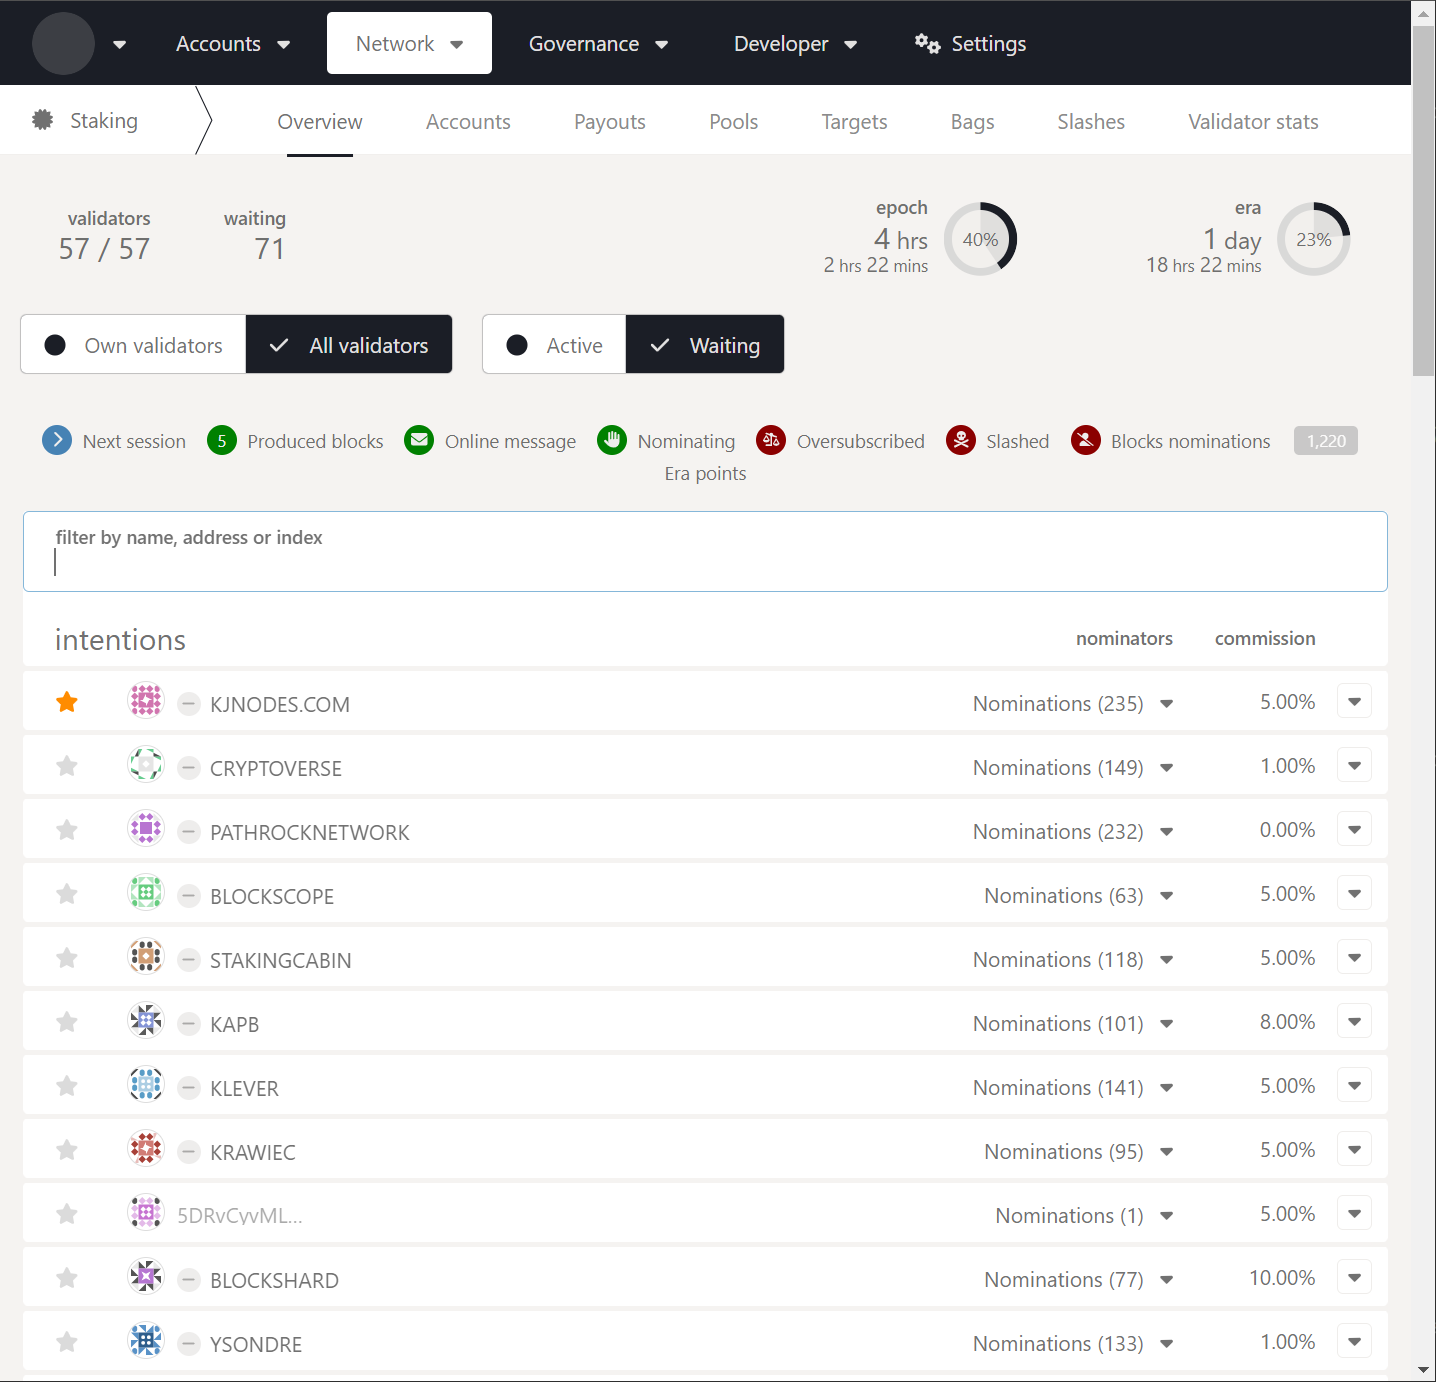
- Go to the Staking tab and select
Waitingto see if your account appears. - If your node has enough stake, it will be elected in the next era or two.
- A new set of validators is chosen every era, based on the amount staked.

Congratulations, you have successfully setup the node and registered validator! 🥳